Friday, May 28, 2010

Ice box cake/cupcakes

This reminded me of my faux-reo post and sent me straight to Nomvana.  I'm doing South Beach, but if I make this for a party and only have a tiny slice, or a mere wafer, or none at all, that's okay, right?  Luckily, Smitten Kitchen teaches us that those DIYers vs. bakers can have some successes here too - Nabisco wafers are for sale on Amazon!!

Chocolate Wafers
1 1/2 cups (6.75 ounces) all-purpose flour
3/4 cup (2.4 ounces) unsweetened cocoa powder (I'd recommend Black Cocoa)
1 cup plus 2 tablespoons sugar
1/4 teaspoon salt
1/4 teaspoon baking soda
14 tablespoons (1 3/4 sticks) unsalted butter, slightly softened
3 tablespoons whole milk
1 teaspoon pure vanilla extract

Combine the flour, cocoa, sugar, salt, and baking soda in the bowl of food processor and pulse several times to mix thoroughly. Cut the butter into about 12 chunks and add them to the bowl. Pulse several times. Combine the milk and vanilla in a small cup. With the processor running, add the milk mixture and continue to process until the mixture clumps around the blade or the sides of the bowl. Transfer the dough to a large bowl or a cutting board and knead a few times to make sure it is evenly blended.
Form the dough into a log about 14 inches long and 1 3/4 inches in diameter. Wrap the log in wax paper or foil and refrigerate until firm, at least one hour, or until needed.
Position the racks in the upper and lower thirds of the oven and preheat the oven to 350°F. Line the baking sheets with parchment paper. Cut the log of dough into slices a scant 1/4-inch thick (I went thinner, closer to 1/8 of inch. If you’re trying to emulate the store-bought wafers, slice as thin as you can, and watch the baking time carefully, as it might be less.) and place them one inch apart on the lined sheets (cookies will spread). Bake, rotating the baking sheet from top to bottom and back to front about halfway through baking, for a total of 12 to 15 minutes. The cookies will puff up and deflate; they are done about 1 1/2 minutes after they deflate.
Cool the cookies on the baking sheets on racks, or slide the parchment onto racks to cool completely. These cookies may be stored in an airtight container for up to two weeks or be frozen for up to two months.
Note: These cookies should crisp as they cool. If they don’t, you’re not baking them long enough, says Medrich — in which case, return them to the oven to reheat and bake a little longer, then cool again.
Icebox Cupcakes
I came up with these a while ago as a way to make the icebox cake a little more single serving size. How many you’ll get depends on how many you want to stack — I use five, but the height comes up a tad short of your standard frosting-dolloped bakery cupcake. They’re decadent enough, in my opinion. Keep in mind that your cupcake will be too big for a standard sized paper liner, I just pressed the sides down a bit to make mine work. But if I knew I was making an entire batch of these, I’d make the cookie log smaller, more like 1 1/4 to 1 1/2 inches in diameter.
Makes about a dozen cupcakes, but this will vary depending on the size and thickness of your cookies, and the height of your stacks. I use five apiece.
1 batch of Chocolate Wafers (recipe above)
1 cup whipping cream
1 to 2 spoons of powdered sugar (adjusted to your preferred sweetness; I like my whipped cream barely sweetened)
A dash of your favorite flavoring or extract (I use about 1/2 teaspoon vanilla)
Whip cream with a spoonful or two of powdered sugar and a dash of a flavoring of your choice, until the whipped cream holds firm peaks. Spread about two teaspoons whipped cream between each cookie, to the edges, and stack them until you reach the height you’d like. If you spread whipped cream on top of the final cookie, you will end up with a softer lid — a good thing — but I prefer the look of the brown cookie top.
Set them in the fridge at least overnight or up to a day. The cookies will soften as they set, and become cake-like.
As an icebox cookie, these will take longer to soften than the store-bought wafers, so set aside more time than you normally would. I think 24 hours in the fridge would be ideal.

Thursday, May 27, 2010

So. . . now I need a mini cupcake maker

I was looking for a mini pancake pan like the ones we saw used in Melbourne when we were there (which I couldn't find, boo), when I found this.  And now I'm pretty sure I need it.  I justify the need for an otherwise useless, space taking up sort of silly gadget because I like to make cupcakes yo.
Also, tiny things are cute.  See?:


http://farm1.static.flickr.com/239/523945200_3718dd27f0.jpg

Wednesday, May 26, 2010

Office Breakroom Chocolate Cake

Thanks to Liz over at Home Sweet Homewrecker, comes this fantabulously easy "yes you can make chocolate cake at the office" recipe.  My coworkers are about to hate me as this will undoubtedly be far more torturous than microwave popcorn.

Tuesday, May 4, 2010

Corned Beef & Cabbage II

Just in case I crave this outside of March and the Trader Joe's stuff isn't readily available, I figured I should bookmark a real recipe too.  I didn't make it this year, and I'm feeling a little cheated.  :(

Corned Beef & Cabbage
4 pounds lean raw corned beef brisket
3 tablespoons pickling spice (often included with brisket)
1 medium rutabaga, halved and cut into wedges
1 pound large carrots, cut into 4-inch pieces
1 1/4 pounds large fingerling potatoes
1 leek, white and light-green parts only, cut into 3-inch pieces
1/2 head Savoy cabbage, cut into wedges
1/3 cup horseradish, drained (yeah, I'll be skipping this - yellow mustard for me please!)
1/3 cup creme fraiche or sour cream

Place the corned beef in a large slow cooker and scatter the pickling spices on top. Layer the rutabaga, carrots, potatoes and leek in the cooker (in this order for even cooking). Add enough hot water (4 to 5 cups) to cover the meat by at least 1 inch, put the lid on the slow cooker and cook on high, 7 to 8 hours.
Remove the meat and vegetables from the slow cooker and keep warm. Put the cabbage in a microwave-safe dish with 2 cups cooking liquid from the slow cooker, cover and microwave until tender, 7 to 10 minutes. Meanwhile, boil another cup of cooking liquid in a small skillet until reduced by half, about 10 minutes. Mix with the horseradish (horf!) and creme fraiche in a small bowl.
Slice the corned beef and serve with the slow-cooked vegetables, cabbage and sauce; reserve about a quarter each of the meat and vegetables and 1 1/2 cups cooking liquid for Corned Beef Hash.

Monday, May 3, 2010

Dips

I'm in an entertaining mood, and dips and entertaining seem to go hand in hand.  It's not superbowl season anymore, but this is still a great list to keep on hand.

I'm all about the:
fondue (duh) Rub a small pot with garlic; add 1 cup white wine and simmer. Whisk in 1 tablespoon cornstarch mixed with a splash of cognac, then 1/4 pound each gruyère and emmentaler cheese; add salt, pepper and nutmeg. Serve hot with apples and bread.  (I'm thinking I will do this a la Luna Park and make goat cheese fondue, obvi)
hummus variations:
Tahini Dip Puree 1/2 cup tahini (sesame paste), the juice of 2 lemons, 2 teaspoons ground cumin and 1 minced garlic clove. Drizzle in 1/2 cup hot water; puree until smooth.
Hummus Make a half batch of Tahini Dip (No. 2); puree with 1 can chickpeas, 3 tablespoons olive oil and 1/2 cup hot water.
Red Pepper Hummus Make a half batch of Tahini Dip (No. 2); puree with 1 can chickpeas, 3 tablespoons olive oil, 1/2 cup roasted red peppers and
1/2 cup hot water.

Tomato Tapenade Make Olive Tapenade (Pulse 1 cup black olives, 3 anchovies, 2 tablespoons each olive oil and capers, 1 tablespoon each lemon juice and parsley, 1 teaspoon fresh thyme and 1 garlic clove in a food processor. ) with 2 cups oil-packed sun-dried tomatoes instead of olives. Use white wine vinegar in place of the lemon juice and basil instead of thyme. Thin with water.
Romesco Dip Puree 1/2 cup toasted almonds, 2 roasted red peppers, 2 chopped seeded tomatoes, 1 garlic clove, 1 slice toast and 1 teaspoon smoked paprika. Add 2 tablespoons sherry vinegar and 1/4 cup olive oil; puree.
Slow Cooker Spinach Dip Mix 1 cup grated smoked mozzarella, 1/2 cup grated parmesan, 8 ounces cream cheese, 1 minced garlic clove, 1 box thawed frozen spinach, 1 jar artichoke hearts, and salt and pepper in a slow cooker. Cover and cook on high, 2 hours.
Pepper-Rosemary Dip Sauté 1 minced garlic clove in 1/4 cup olive oil. Puree 1/2 cup jarred piquillo peppers, 1 teaspoon chopped rosemary, 11 ounces goat cheese, half of the garlic oil, and salt and pepper; top with more garlic oil.
Onion Dip Sauté 1 each chopped yellow and red onion in olive oil over low heat until caramelized, 30 minutes; cool. Mix with 1 1/2 cups sour cream, 3/4 cup mayonnaise and chopped chives and scallions. Add Worcestershire sauce, salt and pepper.
Roasted Garlic Bacon Dip  Cut the tops off 2 heads garlic, drizzle with olive oil, wrap in foil and bake at 400 degrees until tender, 45 minutes. Make Onion Dip (above) using the roasted garlic pulp in place of the sautéed onions. Add 6 slices chopped crisp bacon.
White-Bean Dip Fry 10 sage leaves, 4 chopped garlic cloves and a pinch of red pepper flakes in 1/4 cup olive oil. Add 1 can cannellini beans and 1/3 cup water; warm through, then puree. Add a splash of lemon juice and a pinch of salt.
Queso Dip Saute 3 tablespoons minced onion in oil. Add 1 can green chiles, 2 tablespoons flour, 1/3 cup beer, 1/4 pound each grated muenster and cheddar and a handful of chopped cilantro; cook until the cheese melts, then broil until bubbly.
Chorizo Dip Make Queso Dip (above); brown 1/4 pound sliced chorizo with the onion and replace the canned chiles with 1 diced jalapeño.
Ricotta-Tomato Dip Simmer 2 cups tomato sauce in a small skillet. Add 1 cup ricotta in dollops and warm through. Garnish with basil and drizzle with olive oil.
Pizza Dip Make Ricotta-Tomato Dip (No. 49) in a small ovenproof skillet; top with diced mozzarella and pepperoni, then bake at 350 degrees until bubbling.

And of course, guacamole.
Pile 1/4 cup chopped onion, 1 to 3 chopped serrano chiles, 3/4 cup torn cilantro and a big pinch of kosher salt on a cutting board. Chop, then mash into a paste with the flat side of a large knife. Transfer to a bowl, add 3 diced avocados and mash with a wooden spoon until combined but still chunky. Stir in 1 medium diced tomato and season with salt. Top with more tomato, cilantro and onion.

Balsamic Glazed Squash

I was reading the readers' letters in Food Network Mag and someone mentioned that this was their new go to side dish, and well, I love balsamic and squash is SB friendly and there you have it.

Toss 1 large acorn squash (cut into wedges) in a baking dish with 3 tablespoons each melted butter and balsamic vinegar, 2 sliced shallots, 6 chopped sage leaves, 1 tablespoon honey, a pinch of ground coriander, and salt and pepper. Add 1/2 cup water and roast at 450 degrees F, 20 minutes; flip, sprinkle with 1/4 cup hazelnuts and roast 20 more minutes.

Braised Short Ribs

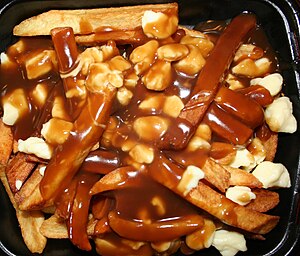
Poutine.JPG
I'm currently kickin' it in Vancouver, at the Fairmont Pacific Rim where room service offers up a version of poutine with 24 hour braised short ribs.  While it wasn't the best poutine I've had, it was still tasty, and mmmm, short ribs.  I found way too many versions, and now that I have my slow cooker back I'd love to whip up a batch some night.  But which to choose?!  And dare I serve it on top of fries and cheese curd?  I can hear South Beach scowling at me from here - so maybe just some mashed sweet potatoes.

Braised Short Ribs with Mushrooms?!
Scott's Short Ribs from Ina Garten?!
The recipe that some spammer posted to all of the other short rib recipes saying it was better?!

Faux-reos


Sing it with me gang (and I apologize for the awful quality; but hey, it was the 80s):
Who's that kid with the faux-reo cookie; licking up the creamy middle like she did when she was little. . . . . it's hard to hide the kid inside when you're eatin' - a faux-r-e-o!!
Twice now in the last week, I have been faced with homemade oreo-ness; faux-reo if you will (and I will).  I don't know if I ever told you this dirty little secret of mine, but one of my All Time Favorite desserts was the Oreo Madness from TGIFriday's.  Really.  It was two coffee plate sized dark black oreo-esque cookies, with vanilla ice cream in the middle; drizzled with packets of hot fudge and caramel sauce that we'd nuke in the microwave.  Really.  And it was DIVINE.  Once I no longer worked there and didn't have access to them whenever I wanted (and when we had them in stock), I came to love brownies in place of the cookie.  It's still one of my absolute favorite combos.
Well then I was playing on the interwebs, discovering the world of black cocoa, and it's few uses (no really, what else do you use this stuff for?) and there you have it.  My introduction to the faux-reo.
THEN - I was reading Food Network Magazine (no, it's not enough to just watch it on tv every day, I also need to read about it on airplanes, yes - thanks for asking), and they reference this chocolate cookie ice cream sandwich with butter pecan ice cream and caramel and YES PLEASE.  And now I'm obsessing.  Which is maybe where the name for the replacement dessert at TGIF came from - Brownie Obsession.  Hmmm.

Thanks Kyle Minor!  I have GOT to get that King Arthur cookbook!  And I am TOTALLY making these with mint this Christmas. 


FAUX-REOS


If they gave Pulitzer Prizes for cookbooks, The King Arthur Flour Baker's Companion would likely be among their oldest laureates. The basics are there, of course -- wheat bread, cream scones, shortbread, croissants, the perfect yellow cake -- but like a hymnal that ventures into the gems of modern church music, this book has charming and innovative variations and unique concoctions that make a baker sit up and take notice.


Black cocoa powder being as it is a hyper-Dutched version of standard cocoa powder usually far to powerful to use on it's own, needing to be added in small amounts to supplement regular Dutch-process cocoa to give it that je ne sais quoi that every baker wants to wow his audience with.  Here, though, it is the only "chocolate" used in the whole recipe, and stands on it's own only because it's relative bitterness is offset by the sweetness of the cookie and filling -- and probably to a large extent because it's the unmistakable taste of Oreos™ that so many of us know and love.


Remember to watch the time when baking these dark chocolate cookies... you won't be able to eyeball them to figure out when they're done since they start out almost black to begin with!  Get them to uniform thickness, watch your timer, and always know how accurate your oven temperature is.


Use a cookie scoop to help keep the cookies uniform in size; matching up two halves to make a whole sandwich cookie is SO much easier when you've taken that extra step ahead of time. If you want your filling to be stiffer and more like actual Oreo™ filling, you can also try adding 1 tsp + ¼ heaping tsp unflavored gelatin to 2 Tbsp of cold water and letting it sit for a few minutes, mixing the resulting slurry into the filling. I liked the addition of a Tbsp of salted butter for the richer flavor that both the butterfat and the salt brought to the table. If you want the mint version, crush up a few candy canes or peppermint candies to taste, or simply add a teaspoon or less of peppermint extract -- and maybe leave out the vanilla extract.


This recipe makes about 25 sandwich cookies that keep for 3-5 days at room temperature in an airtight container.


For the cookies:

    • 1 cup + 2 Tbsp granulated sugar
    • ¾ cup unsalted butter
    • ½ tsp salt
    • 1 tsp espresso powder (optional, mainly for use with Dutched cocoa)
    • 1 large egg
    • 1 Tbsp cold water
    • 1 tsp vanilla extract
    • 1 ½ cups all-purpose flour
    • ¾ cup black cocoa or Dutch-process cocoa


For the filling:

    • 2 ½ cups confectioners' sugar
    • ½ cup vegetable shortening
    • 1 Tbsp salted butter (or unsalted with a dash of salt added), room temperature to slightly cool, but still mixable
    • 1 teaspoon vanilla extract
    • 2 teaspoons cold water*


*If you're adding the crushed peppermint candy, increase water to 2 Tbsp


Preheat the oven to 325°F. Lightly grease (or line with parchment) two baking sheets, or more if you have them.


To make the cookies: In a medium-sized mixing bowl, beat together the sugar, butter, salt, and espresso powder. That's right; there's no leavening in this recipe, so don't worry that something's been left out.


Beat in the egg, water, and vanilla, then the flour and cocoa. The dough will be very stiff.


Roll or scoop the dough into balls about the size of a chestnut (about 2 level teaspoons). A teaspoon-sized cookie scoop is IDEAL for this job. Place the dough balls on the prepared baking sheets, leaving about 1½" to 2" between them.


Use the flat bottom of a glass, dipped in cocoa as necessary to prevent sticking, to flatten the cookies to about 1/8" to 3/16" thick. Take a ruler and measure the cookies' thickness; you want to get pretty close to this measurement.


Bake the cookies (in batches if need be) for 18 to 20 minutes. It's important to bake them just the right amount of time; too little, and they won't be crisp; too much, and they'll scorch. Watch them closely at the end of the baking time, and if you start to smell scorching chocolate before the time is up, take them out. When they're done, remove the cookies from the oven, and allow them to cool completely, on a rack or on the pan.


While the cookies are cooling, make the filling: Beat together the sugar, shortening, butter and vanilla. It'll seem very dry at first, but will eventually begin to clump together.


Add the water a little at a time, beating till smooth and spreadable. The filing should be stiff, but not so stiff that you can't flatten it when you sandwich it between the cookies. Adding a little extra confectioners sugar can help stiffen up a too-loose dough.


Place one Tbsp filling in the center of one cookie; again, a teaspoon cookie scoop, slightly heaped, is perfect for this task. Place another cookie atop the filling, and squeeze to distribute the filling evenly. Repeat with the remaining cookies. Store in an airtight container for up to 5 days.


Now, take Kyle's faux-reo wafers (sans filling), and add the Food Network ice cream cookie plan and you're in business!  The business of delicious.

And if you're feeling gifty, here is the book I want.  Or you can pick it up for yourself if you'd prefer.